搜索到
52
篇与
android
的结果
-

-
Android加密算法之AES 什么是高级加密标准或AES?AES加密标准又称为高级加密标准Rijndael加密法,是美国国家标准技术研究所NIST旨在取代DES的21世纪的加密标准。AES加密如何工作?AES是一种对称的加密算法,可基于相同的密钥进行加密和解密。AES包含三个分组密码:AES-128,AES-192和AES-256。每个密码分别使用128 位,192位和256位的加密密钥对128 位块中的数据进行加密和解密。代码:object AESCrypt { private const val AES_MODE = "AES/CBC/PKCS7Padding" //"算法/模式/补码方式" private const val CHARSET = "UTF-8" private const val CIPHER = "AES" private const val HASH_ALGORITHM = "SHA-256" private val IV_BYTES = byteArrayOf(0x00, 0x00, 0x00, 0x00, 0x00, 0x00, 0x00, 0x00, 0x00, 0x00, 0x00, 0x00, 0x00, 0x00, 0x00, 0x00) /** * Generates SHA256 hash of the password which is used as key * * @param password used to generated key * @return SHA256 of the password */ @Throws(NoSuchAlgorithmException::class, UnsupportedEncodingException::class) private fun generateKey(password: String): SecretKeySpec { val digest = MessageDigest.getInstance(HASH_ALGORITHM) val bytes = password.toByteArray(charset(CHARSET)) digest.update(bytes, 0, bytes.size) val key = digest.digest() return SecretKeySpec(key, CIPHER) } /** * Encrypt and encode message using 256-bit AES with key generated from password. * * @param password used to generated key * @param message the thing you want to encrypt assumed String UTF-8 * @return Base64 encoded CipherText * @throws GeneralSecurityException if problems occur during encryption */ @Throws(GeneralSecurityException::class) fun encrypt(password: String, message: String): String { try { val key = generateKey(password) val cipherText = encrypt(key, IV_BYTES, message.toByteArray(charset(CHARSET))) //NO_WRAP is important as was getting \n at the end return Base64.encodeToString(cipherText, Base64.NO_WRAP) } catch (e: UnsupportedEncodingException) { throw GeneralSecurityException(e) } } /** * More flexible AES encrypt that doesn't encode * * @param key AES key typically 128, 192 or 256 bit * @param iv Initiation Vector * @param message in bytes (assumed it's already been decoded) * @return Encrypted cipher text (not encoded) * @throws GeneralSecurityException if something goes wrong during encryption */ @Throws(GeneralSecurityException::class) fun encrypt(key: SecretKeySpec, iv: ByteArray, message: ByteArray): ByteArray { val cipher = Cipher.getInstance(AES_MODE) val ivSpec = IvParameterSpec(iv) cipher.init(Cipher.ENCRYPT_MODE, key, ivSpec) return cipher.doFinal(message) } /** * Decrypt and decode ciphertext using 256-bit AES with key generated from password * * @param password used to generated key * @param base64EncodedCipherText the encrpyted message encoded with base64 * @return message in Plain text (String UTF-8) * @throws GeneralSecurityException if there's an issue decrypting */ @Throws(GeneralSecurityException::class) fun decrypt(password: String, base64EncodedCipherText: String): String { try { val key = generateKey(password) val decodedCipherText = Base64.decode(base64EncodedCipherText, Base64.NO_WRAP) val decryptedBytes = decrypt(key, IV_BYTES, decodedCipherText) return String(decryptedBytes, charset(CHARSET)) } catch (e: UnsupportedEncodingException) { throw GeneralSecurityException(e) } } /** * More flexible AES decrypt that doesn't encode * * @param key AES key typically 128, 192 or 256 bit * @param iv Initiation Vector * @param decodedCipherText in bytes (assumed it's already been decoded) * @return Decrypted message cipher text (not encoded) * @throws GeneralSecurityException if something goes wrong during encryption */ @Throws(GeneralSecurityException::class) fun decrypt(key: SecretKeySpec, iv: ByteArray, decodedCipherText: ByteArray): ByteArray { val cipher = Cipher.getInstance(AES_MODE) val ivSpec = IvParameterSpec(iv) cipher.init(Cipher.DECRYPT_MODE, key, ivSpec) return cipher.doFinal(decodedCipherText) } }添加扩展方法,方便调用private const val key: String = "Your AES Key" fun encrypt(input: String): String { return AESCrypt.encrypt(key, input) } fun decrypt(input: String): String { return AESCrypt.decrypt(key, input) } fun String.aesEncrypt(): String = encrypt(this) fun String.aesDecrypt(): String = decrypt(this)使用方法"明文".aesEncrypt() "密文".aesDecrypt()
-
解决NestedScrollView嵌套RecyclerView滚动监听问题 不使用recyclerview的监听,直接用NestedScrollView的监听scrollView.setOnScrollChangeListener( NestedScrollView.OnScrollChangeListener { v, scrollX, scrollY, oldScrollX, oldScrollY -> if (scrollY > oldScrollY) { Log.i(TAG, "Scroll DOWN") } if (scrollY < oldScrollY) { Log.i(TAG, "Scroll UP") } if (scrollY == 0) { Log.i(TAG, "TOP SCROLL") } if (scrollY == v.getChildAt(0).measuredHeight - v.measuredHeight) { Log.i(TAG, "BOTTOM SCROLL") } })
-
android加密算法之MD5 方法1fun getMD5A(str: String): String? { return try { val md: MessageDigest = MessageDigest.getInstance("MD5")//生成一个MD5加密计算摘要 md.update(str.toByteArray()) //计算md5函数 var md5Str: String = BigInteger(1, md.digest()).toString(16) if (md5Str.length < 32) { md5Str = "0$md5Str" } md5Str } catch (e: Exception) { throw Exception("MD5加密出现错误") } }方法2,修改hexDigits可生所不同的字符串:例如:charArrayOf('5','2','0','1','3','1','4','7','8','9','a','b','c','d','e','f')fun getMD5B(str: String): String? { val hexDigits = charArrayOf('0','1','2','3','4','5','6','7','8','9','a','b','c','d','e','f') return try { val mdInst = MessageDigest.getInstance("MD5") mdInst.update(str.toByteArray()) val md = mdInst.digest() val j = md.size val str = CharArray(j * 2) var k = 0 for (i in 0 until j) { val byte0 = md[i] str[k++] = hexDigits[byte0.toInt().ushr(4) and 0xf] str[k++] = hexDigits[byte0.toInt().and(0xf)] } String(str) } catch (e: java.lang.Exception) { e.printStackTrace() null } }
-
-
-
显示PopupMenu时滚动toolbar 我在Fragment里弹PopupMenu时会把toolbar向上滚动<android.support.design.widget.CoordinatorLayout xmlns:android="http://schemas.android.com/apk/res/android" xmlns:app="http://schemas.android.com/apk/res-auto" android:layout_width="match_parent" android:layout_height="match_parent" android:fitsSystemWindows="true" android:id="@+id/coordinatorLayout"> <android.support.design.widget.AppBarLayout android:layout_width="match_parent" android:layout_height="wrap_content" android:theme="@style/ThemeOverlay.AppCompat.Dark.ActionBar"> <android.support.v7.widget.Toolbar android:id="@+id/toolbar" android:layout_width="match_parent" android:layout_height="?attr/actionBarSize" android:background="?attr/colorPrimary" app:layout_scrollFlags="scroll|enterAlways" app:popupTheme="@style/ThemeOverlay.AppCompat.Light" /> <android.support.design.widget.TabLayout android:id="@+id/tabs" android:layout_width="match_parent" android:layout_height="wrap_content" app:tabMode="fixed" app:tabGravity="fill"/> </android.support.design.widget.AppBarLayout> <android.support.v4.view.ViewPager android:id="@+id/viewpager" android:layout_width="match_parent" android:layout_height="match_parent" app:layout_behavior="@string/appbar_scrolling_view_behavior" /> <android.support.design.widget.FloatingActionButton android:id="@+id/floatingButton" android:layout_width="wrap_content" android:layout_height="wrap_content" android:layout_gravity="bottom|end" android:layout_margin="@dimen/fab_margin" android:src="@drawable/ic_add" /> </android.support.design.widget.CoordinatorLayout>解决办法:PopupMenu popupMenu = new PopupMenu(MainActivity.this,view);替换成PopupMenu popupMenu = new PopupMenu(MainActivity.this,view, Gravity.RIGHT);
-
Caused by: android.view.InflateException: Binary XML file line #258: Error inflating class android.webkit.WebView 看到有部分机型出现了BUG,并有用户也反馈了升级后某页面无法打开:Caused by: android.view.InflateException: Binary XML file line #258: Error inflating class android.webkit.WebView回想一下新版本做的改动,有问题的页面也就是调整了下布局,而用了WebView的地方也只有Admob广告而已,这里并没有改动,Google了一会儿,原来罪魁祸首的是appcompat,旧版本用的是appcompat1.0.2,新版本用的是appcompat:1.1.0。具体原因不明,改回1.0.2后测试正常,用新的androidx.appcompat:appcompat:1.2.0-alpha03也没问题。解决方案:https://stackoverflow.com/questions/41025200/android-view-inflateexception-error-inflating-class-android-webkit-webview
-
-
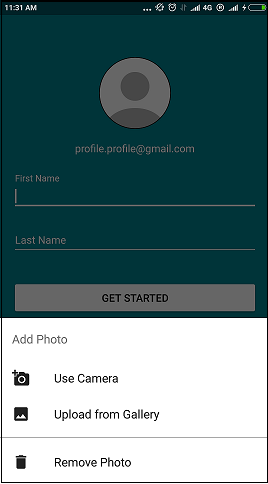
使用BottomSheetDialogFragment底部弹框 步骤1:为底页创建布局文件<LinearLayout xmlns:android="http://schemas.android.com/apk/res/android" android:layout_width="match_parent" android:layout_height="wrap_content" android:layout_marginBottom="@dimen/dp_8" android:layout_marginTop="@dimen/dp_8" android:orientation="vertical"> <TextView android:id="@+id/tv_bottom_sheet_heading" android:layout_width="wrap_content" android:layout_height="@dimen/dp_56" android:layout_marginEnd="@dimen/dp_16" android:layout_marginStart="@dimen/dp_16" android:gravity="center" android:text="@string/bottom_sheet_option_heading" android:textColor="@color/md_bottom_sheet_title_color" android:textSize="16sp" /> <TextView android:id="@+id/tv_btn_add_photo_camera" android:layout_width="match_parent" android:layout_height="@dimen/dp_48" android:layout_marginEnd="@dimen/dp_16" android:layout_marginStart="@dimen/dp_16" android:backgroundTint="@android:color/white" android:drawablePadding="@dimen/dp_32" android:drawableStart="@drawable/ic_add_a_photo" android:drawableTint="@color/md_bottom_sheet_text_color" android:gravity="start|center_vertical" android:text="@string/bottom_sheet_option_camera" android:textColor="@color/md_bottom_sheet_text_color" android:textSize="16sp" /> <TextView android:id="@+id/tv_btn_add_photo_gallery" android:layout_width="match_parent" android:layout_height="48dp" android:layout_marginEnd="@dimen/dp_16" android:layout_marginStart="@dimen/dp_16" android:backgroundTint="@android:color/white" android:drawablePadding="@dimen/dp_32" android:drawableStart="@drawable/ic_gallery_photo" android:drawableTint="@color/md_bottom_sheet_text_color" android:gravity="start|center_vertical" android:text="@string/bottom_sheet_option_gallery" android:textColor="@color/md_bottom_sheet_text_color" android:textSize="16sp" /> <View android:layout_width="match_parent" android:layout_height="1dp" android:layout_marginBottom="@dimen/dp_8" android:layout_marginTop="@dimen/md_bottom_sheet_separator_top_margin" android:background="@color/grayTextColor" /> <TextView android:id="@+id/tv_btn_remove_photo" android:layout_width="match_parent" android:layout_height="@dimen/dp_48" android:layout_marginEnd="@dimen/dp_16" android:layout_marginStart="@dimen/dp_16" android:backgroundTint="@android:color/white" android:drawablePadding="@dimen/dp_32" android:drawableStart="@drawable/ic_delete_photo" android:drawableTint="@color/md_bottom_sheet_text_color" android:gravity="start|center_vertical" android:text="@string/bottom_sheet_option_remove_photo" android:textColor="@color/md_bottom_sheet_text_color" android:textSize="16sp" /> </LinearLayout>步骤2:创建dimen.xml文件:<?xml version="1.0" encoding="utf-8"?> <resources> <dimen name="dp_8">8dp</dimen> <dimen name="dp_16">16dp</dimen> <dimen name="dp_24">24dp</dimen> <dimen name="dp_32">32dp</dimen> <dimen name="dp_40">40dp</dimen> <dimen name="dp_48">48dp</dimen> <dimen name="dp_56">56dp</dimen> <dimen name="dp_64">64dp</dimen> <dimen name="dp_72">72dp</dimen> <dimen name="dp_80">80dp</dimen> <dimen name="dp_160">160dp</dimen> <dimen name="md_bottom_sheet_separator_top_margin">7dp</dimen> </resources>步骤3:string.xml文件:<string name="bottom_sheet_option_camera">Use Camera</string> <string name="bottom_sheet_option_gallery">Upload from Gallery</string> <string name="bottom_sheet_option_heading">Add Photo</string> <string name="bottom_sheet_option_remove_photo">Remove Photo</string>步骤4:创建自定义BottomSheetDialogFragmentpublic class AddPhotoBottomDialogFragment extends BottomSheetDialogFragment{ public static AddPhotoBottomDialogFragment newInstance() { return new AddPhotoBottomDialogFragment(); } @Nullable @Override public View onCreateView(LayoutInflater inflater, @Nullable ViewGroup container, @Nullable Bundle savedInstanceState) { View view = inflater.inflate(R.layout.layout_photo_bottom_sheet, container, false); // get the views and attach the listener return view; } }步骤5:在Activity中弹出FragmentDialog:AddPhotoBottomDialogFragment addPhotoBottomDialogFragment = AddPhotoBottomDialogFragment.newInstance(); addPhotoBottomDialogFragment.show(getSupportFragmentManager(), "add_photo_dialog_fragment");就这样完成了:您可以在自定义底部工作表对话框片段中创建自定义回调接口,以在单击底部的按钮时通知Activity