搜索到
75
篇与
默认分类
的结果
-
 Android之Init init是Linux系统中用户控件的第一个进程,init的职责:1.init进程创建系统中的几个关键进程,如zygote进程2.Android系统中有很多属性,于是init提供了一个property service来管理它们。init的工作流程:解析两个配置文件,我们将分析其中对init.rc文件的解析执行各个阶段的动作,创建zygote的工作就是在其中的某个阶段完成的调用property_init初始化属性相关的资源,并且通过property_start_server启动属性服务init进入一个无限循环,并且等待一些事情发生。重点关注init如何处理来自socket和来自属性服务器的相关事情解析配置文件: init会解析两个配置文件,一个是init.rc,另一个与硬件平台相关。解析配置文件调用的parse_config_file函数。这个函数中主要是读取配置文件(read_file),读取结束后调用parse_config函数进行真正的解析keyword.h文件中定义了init中使用关键字通过两次包含得到了一个keyword_info结构体数组。zygote是由init进程fork并且execv(这时会传入一个环境变量,在ZygoteInit.java的main方法中会用到)后创建的。zygote进程死后、它的父进程init会找到代表zygote的那个service并且杀掉zygote创建的所有子进程,Java世界也就崩溃了zygote的重启,zygote死的时候会将service结构体的flags设置为SVC_RESTARTING;inti.c::main函数中有一个代码片段zygote就重启for(;;){ int nr, i, timeout = -1; for (i = 0; i < fd_count; i++} ufds[i].revents = 0; drain_action_queue () ; //poll A数返回后,会进入下一轮的循环 restart_processes () ; // 这里会重启所有 flag 标志为 SVC_RESTARTING的 service。 }init.rc是一个配置文件,是由Android初始化语言编写的脚本,主要包含五种类型语句:Action、Command、Service、Option、ImportAction动作由一组命令(Commands)组成,动作还包含了一个触发器,决定了运行这个动作的时机。通过触发器trigger,即通过以on开头的语句来决定执行相应的service的时机,具体有如下时机:on early-init; 在初始化早期阶段触发;on init; 在初始化阶段触发;on late-init; 在初始化晚期阶段触发;on boot/charger: 当系统启动/充电时触发;on property:<key>=<value>: 当属性值满足条件时触发;CommandCommand是action 的命令列表中命令,或者是service中的选项onrestart的参数命令,命令将在所属事件发生时被一个一个的执行。常用命令如下:class_start <service_class_name>: 启动属于同一个class的所有服务;class_stop <service_class_name> : 停止指定类的服务start <service_name>: 启动指定的服务,若已启动则跳过;stop <service_name>: 停止正在运行的服务setprop <name> <value>:设置属性值mkdir <path>:创建指定目录symlink <target> <sym_link>: 创建连接到<target>的<sym_link>符号链接;write <path> <string>: 向文件path中写入字符串;exec: fork并执行,会阻塞init进程直到程序完毕;exprot <name> <name>:设定环境变量;loglevel <level>:设置log级别hostname <name> : 设置主机名import <filename> :导入一个额外的init配置文件Service服务Service,以service开头,由init进程启动,一般运行在init的一个子进程中,所以启动service前需要判断对应的可执行文件是否存在。命令:service <name><pathname> [ <argument> ]* <option> <option><name>:表示service的名称<pathname>:表示此 service 所在的路径( service 为可执行文件,所以存在存储路径)<argument>:表示启动 service 所带的参数<option>:表示对此 service 的约束选项init生成的子进程,定义在rc文件,其中每一个service在启动时会通过fork方式生成子进程。OptionOptions是Service的可选项,与service配合使用disabled: 不随class自动启动,只有根据service名才启动;oneshot: service退出后不再重启;user/group: 设置执行服务的用户/用户组,默认都是root;class:设置所属的类名,当所属类启动/退出时,服务也启动/停止,默认为default;onrestart:当服务重启时执行相应命令;socket: 创建名为/decdcritical: 在规定时间内该service不断重启,则系统会重启并进入恢复模式default: 意味着 disabled=false,oneshot=false,critical=falseImport用来导入其他的 rc 文件命令:import <filename>init.rc实例从Android5.0的版本开始,Android支持64位的编译,因此Zygote本身也支持32位和64位。通过属性ro.zygote来控制不同版本的zygote进程启动。init.rc位于"/system/core/rootdir"目录下,在这个路径下还包括四个关于zygote的rc文件。分别是init.zygote32.rc,init.zygote32_64.rc,init.zygote64.rc,init.zygote64_32.rc,由硬件决定调用哪个文件。import /init.environ.rc import /init.usb.rc import /init.${ro.hardware}.rc import /vendor/etc/init/hw/init.${ro.hardware}.rc import /init.usb.configfs.rc import /init.${ro.zygote}.rc on early-init # Set init and its forked children's oom_adj. write /proc/1/oom_score_adj -1000
 -
Android之Zygote Zygote是Android系统创建新进程的核心进程,负责启动Dalvik虚拟机,加载一些必要的系统资源和系统类,启动system_server进程,随后进入等待处理app应用请求。Zygote进程由init启动:# /vendor/default.prop ro.zygote=zygote64_32 # /init.rc import /init.${ro.zygote}.rc on zygote-start && property:ro.crypto.state=... # A/B update verifier that marks a successful boot. exec_start update_verifier_nonencrypted start netd start zygote start zygote_secondary # /init.zygote64_32.rc service zygote /system/bin/app_process64 -Xzygote /system/bin --zygote --start-system-server --socket-name=zygote class main priority -20 user root group root readproc reserved_disk socket zygote stream 660 root system onrestart write /sys/android_power/request_state wake onrestart write /sys/power/state on onrestart restart audioserver onrestart restart cameraserver onrestart restart media onrestart restart netd onrestart restart wificond writepid /dev/cpuset/foreground/tasks service zygote_secondary /system/bin/app_process32 -Xzygote /system/bin --zygote --socket-name=zygote_secondary --enable-lazy-preload class main priority -20 user root group root readproc reserved_disk socket zygote_secondary stream 660 root system onrestart restart zygote writepid /dev/cpuset/foreground/tasks 属性 ro.zygote 的值包括zygote32、zygote64、zygote32_64、zygote64_32,对应区别如下:init.zygote32.rc:zygote进程对应的执行程序是app_process(纯32bit模式)init.zygote64.rc:zygote进程对应的执行程序是app_process64(纯64bit模式)init.zygote32_64.rc:启动两个zygote进程,对应的执行程序分别是app_process32(主模式)、app_process64init.zygote64_32.rc:启动两个zygote进程,对应的执行程序分别是app_process64(主模式)、app_process32zygote和zygote_secondary其实大同小异,都是执行/system/bin/app_process,其执行的的应用及参数如下:app_process64 -Xzygote /system/bin --zygote --start-system-server --socket-name=zygotemain() AppRuntime::AppRuntime() AndroidRuntime::AndroidRuntime() SkGraphics::Init() // 创建Dalvik缓存 maybeCreateDalvikCache() AndroidRuntime::start("com.android.internal.os.ZygoteInit", args, ) // JniInvocation位于libnativehelper JniInvocation::JniInvocation() /* * 初始化虚拟机环境 * - 加载libart.so, 由art/runtime生成 * - 导出JNI_GetDefaultJavaVMInitArgs * - 导出JNI_CreateJavaVM * - 导出JNI_GetCreatedJavaVMs */ JniInvocation::Init(NULL) AndroidRuntime::startVm(JavaVM, JNIEnv,) // 获取虚拟机参数 AndroidRuntime::parseRuntimeOption() // 位于libnativehelper ??? JNI_CreateJavaVM() JniInvocation::JNI_CreateJavaVM() AppRuntime::onVmCreated() // 向VM注册native函数 AndroidRuntime::startReg() /* * 依次注册预定义的gRegJNI列表, 包括 * frameworks/base/core/jni/android_xxx.cpp * frameworks/base/core/jni/com_xxx.cpp * 下面以android_util_Process.cpp为例 */ register_jni_procs(gRegJNI) register_android_os_Process() /* * 注册 android.os.Process 类 * 注册 android.os.Process.setUid 方法 * ... * * static const JNINativeMethod methods[] = { * ... * {"setUid", "(I)I", (void*)android_os_Process_setUid}, * ... * }; */ RegisterMethodsOrDie(env, "android/os/Process", methods,) AndroidRuntime::registerNativeMethods(env, className, methods, ) jniRegisterNativeMethods() JNINativeInterface::RegisterNatives() /* * 找到入口com.android.internal.os.ZygoteInit(在register_jni_procs中注册) */ JNIEnv::FindClass("com/android/internal/os/ZygoteInit") // 找到入口类的main函数 JNIEnv::GetStaticMethodID(jclass, "main") // 执行com.android.internal.os.ZygoteInit.main() JNIEnv::CallStaticVoidMethod(jclass, jmethodID, jobjectArray) 接下来就是ZygoteInit的执行过程ZygoteInit.main() /* * 在init.zygote*.rc中注册了zygote套接字 * init进程在启动service时会添加环境变量 * 环境变量: "ANDROID_SOCKET_zygote" * * 从环境变量中获取socket的fd * 通过LocalServerSocket()创建服务端 */ ZygoteServer::registerServerSocketFromEnv("zygote") // FIXME: Add More ZygoteInit::preload() // 主动进行GC操作 ZygoteInit::gcAndFinalize() Zygote::nativeSecurityInit() com_android_internal_os_Zygote_nativeSecurityInit() Zygote::nativeUnmountStorageOnInit() com_android_internal_os_Zygote_nativeUnmountStorageOnInit() /* * 启动SystemServer, 重命名为system_server */ ZygoteInit::forkSystemServer() Zygote::forkSystemServer() Zygote::nativeForkSystemServer() com_android_internal_os_Zygote_nativeForkSystemServer() ForkAndSpecializeCommon() fork() // 子进程: com.android.internal.os.Zygote JNIENV::CallStaticVoidMethod("com/android/internal/os/Zygote") // 子进程: FIXME: Add More ZygoteInit::handleSystemServerProcess() ZygoteInit::zygoteInit(, "com.android.server.SystemServer", ) RuntimeInit::commonInit() ZygoteInit::nativeZygoteInit() com_android_internal_os_ZygoteInit_nativeZygoteInit() AppRuntime::onZygoteInit() RuntimeInit::applicationInit() RuntimeInit::findStaticMain("com.android.server.SystemServer", , ) // 执行com.android.server.SystemServer.main() MethodAndArgsCaller.run() /* * 监听zygote socket * 等待客户端消息并处理 * ZygoteConnection用于表示和客户端的连接 */ ZygoteServer::runSelectLoop() ZygoteConnection::processOneCommand() app_process有两种启动模式,都是调用AppRuntime::start(),加载ZygoteInit或RuntimeInit两个Java类Zygote模式: 即初始化zygote进程,也即上面分析的流程Application模式: 即启动普通应用程序,传递的参数有class名字以及class带的参数Zygote启动过程中fork了一个新进程用于启动com.android.server.SystemServer,即SystemServer,文件路径如下:frameworks/base/services/java/com/android/server/SystemServer.javaSystemServer(进程名为system_server)是android服务的提供者,所有service运行在该进程中,主要流程如下:SystemServer::main() SystemServer::run() /* * 一些准备工作 */ Looper.prepareMainLooper() /* * 初始化native服务 * libandroid_servers * <- libservices.core * 由[frameworks/base/services/core/jni/*]编译生成 */ System::loadLibrary("android_servers"); // 位于frameworks/base/services/core/jni/onload.cpp JNI_OnLoad() register_android_server_broadcastradio_BroadcastRadioService() register_android_server_broadcastradio_Tuner() register_android_server_PowerManagerService() /* * 向com.android.server.power.PowerManagerService注册native方法 * 2rd参数: "com/android/server/power/PowerManagerService" * 3rd参数: gPowerManagerServiceMethods * 4rd参数: NELEM(gPowerManagerServiceMethods) */ jniRegisterNativeMethods(JNIEnv, , ,) register_android_server_SerialService() ... // FIXME SystemServer::performPendingShutdown() // 初始化系统上下文 SystemServer::createSystemContext() ActivityThread::systemMain() new ActivityThread() // FIXME: a lot thing seems done ActivityThread::attach(true, 0) ActivityThread::getSystemContext() mSystemServiceManager = new SystemServiceManager() /* * 区别于BinderService, Localservice只在本进程使用 */ LocalServices.addService(SystemServiceManager.class, mSystemServiceManager) /* * 启动关键服务 */ startBootstrapServices(); // FIXME: 读取系统配置 SystemServerInitThreadPool.get().submit(SystemConfig::getInstance, ) /* * 启动[Installer]服务并连接至installd * installd为native服务, 位于frameworks/native/cmds/installd/ */ SystemServiceManager::startService(Installer.class) new Installer() && Installer::onStart() // 启动[设备标识符]服务 SystemServiceManager::startService(DeviceIdentifiersPolicyService.class) new DeviceIdentifiersPolicyService() DeviceIdentifiersPolicyService::onStart() // 启动[AMS]服务 SystemServiceManager::startService(ActivityManagerService.Lifecycle.class) new ActivityManagerService() ActivityManagerService::onStart() // 启动[电源管理服务] SystemServiceManager::startService(PowerManagerService.class) new PowerManagerService() PowerManagerService::onStart() publishBinderService(Context.POWER_SERVICE, new BinderService()); // 向servicemanager注册服务 ServiceManager.addService( , , , ) publishLocalService(PowerManagerInternal.class, new LocalService()); LocalServices.addService( , ) // 初始化电源管理功能 ActivityManagerService::initPowerManagement() SystemServiceManager::startService(RecoverySystemService.class) SystemServiceManager::startService(LightsService.class) // 启动[显示管理服务] SystemServiceManager::startService(DisplayManagerService.class) // 等待默认显示器 SystemServiceManager::startBootPhase(SystemService.PHASE_WAIT_FOR_DE~T_DISPLAY); DisplayManagerService::onBootPhase(SystemService.PHASE_WAIT_FOR_DE~T_DISPLAY) // 启动[PackageManagerService, PMS]服务 PackageManagerService::main(mSystemContext, installer, , ) ActivityManagerService::setSystemProcess() new OverlayManagerService(mSystemContext, installer) SystemServiceManager::startService(mOverlayManagerService) startSensorService() /* * 启动必要服务 */ startCoreServices(); SystemServiceManager::startService(BatteryService.class) SystemServiceManager::startService(UsageStatsService.class) BinderCallsStatsService.start(); /* * 启动其他服务, 太多了, 这里不一一列举 */ startOtherServices(); /* * 进入循环 */ Looper.loop();
-
Android之AMS AMS全称ActivityManagerService,AMS是Android中最核心的服务,主要负责系统中四大组件的启动、切换、调度及应用进程的管理和调度等工作,其职责与操作系统中的进程管理和调度模块相类似,因此它在Android中非常重要。统一调度所有应用程序的Activity的生命周期启动或杀死应用程序的进程启动并调度Service的生命周期注册BroadcastReceiver,并接收和分发Broadcast启动并发布ContentProvider调度task处理应用程序的Crash查询系统当前运行状态ActivityManagerService是在SystemServer.java中启动的。SystemServer会根据顺序依次启动各个服务: // Start services. try { traceBeginAndSlog("StartServices"); startBootstrapServices(); startCoreServices(); startOtherServices(); SystemServerInitThreadPool.shutdown(); } catch (Throwable ex) { Slog.e("System", "******************************************"); Slog.e("System", "************ Failure starting system services", ex); throw ex; } finally { traceEnd(); }执行startBootstrapServices函数:// Activity manager runs the show. traceBeginAndSlog("StartActivityManager"); mActivityManagerService = mSystemServiceManager.startService( ActivityManagerService.Lifecycle.class).getService(); mActivityManagerService.setSystemServiceManager(mSystemServiceManager); mActivityManagerService.setInstaller(installer); traceEnd(); ……这里启动了ActivityManagerService.Lifecycle.class服务, public static final class Lifecycle extends SystemService { private final ActivityManagerService mService; public Lifecycle(Context context) { super(context); mService = new ActivityManagerService(context); } @Override public void onStart() { mService.start(); } public ActivityManagerService getService() { return mService; } }在startService中调用了ActivityManagerService的onStart()方法来启动该服务:public void startService(@NonNull final SystemService service) { // Register it. mServices.add(service); // Start it. long time = System.currentTimeMillis(); try { service.onStart(); } catch (RuntimeException ex) { throw new RuntimeException("Failed to start service " + service.getClass().getName() + ": onStart threw an exception", ex); } warnIfTooLong(System.currentTimeMillis() - time, service, "onStart"); }
-
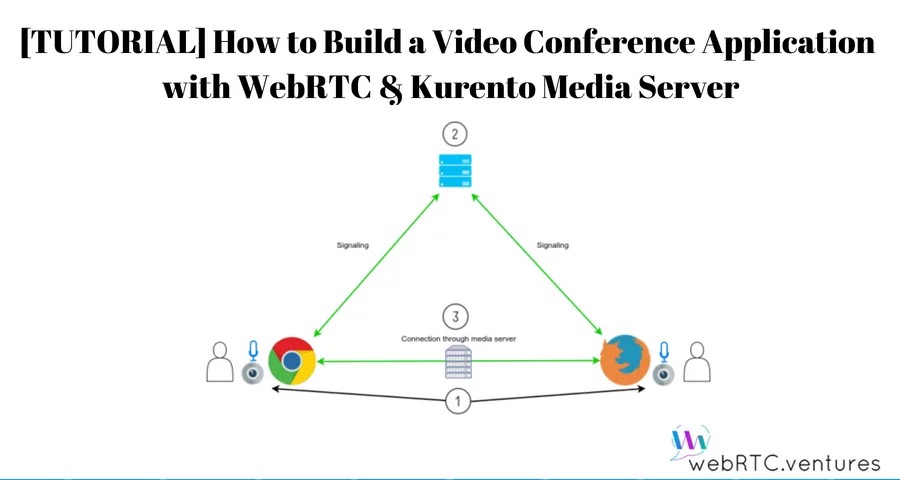
Android Webrtc之Kurento-group-call 简介Kurento-group-call是一个类似视频会议的官方例子,在每个用户端都会创建N个端点,相比one2one-call/one2many-call要复杂些。在用户之间连接多个客户端,创建一个视频会议;同样,运行之前要安装Kurento媒体服务。先克隆项目,然后运行主类:git clone https://github.com/Kurento/kurento-tutorial-java.git cd kurento-tutorial-java/kurento-group-call运行项目mvn -U clean spring-boot:run \ -Dspring-boot.run.jvmArguments="-Dkms.url=ws://{KMS_HOST}:8888/kurento"功能分析用户进入房间时,会创建一个新的Media,另外会通知其他用户有新用户连接,然后所有参于者将请求服务器接收新参于者的媒体。新用户依次获取所有已连接的参于者列表,并请求服务器接收房间中所有客户端的media。每个客户端都发送自己的media,然后从其他用户那里接收媒体,每个客户端都会有n个端点,房间总共会有n*n个端点。当用户离开房间时,服务器会通知所有客户端。然后,客户端代码请求服务器取消与离开的客户端相关的所有媒体元素。服务端实例化Kurento客户端后,您就可以与Kurento媒体服务器通信并控制其多媒体功能了。GroupCallApp实现了接口WebSocketConfigurer,注册了一个WebSocketHandler用于处理WebSocket请求@EnableWebSocket @SpringBootApplication public class GroupCallApp implements WebSocketConfigurer { @Bean public UserRegistry registry() { return new UserRegistry(); } @Bean public RoomManager roomManager() { return new RoomManager(); } @Bean public CallHandler groupCallHandler() { return new CallHandler(); } @Bean public KurentoClient kurentoClient() { return KurentoClient.create(); } public static void main(String[] args) throws Exception { SpringApplication.run(GroupCallApp.class, args); } @Override public void registerWebSocketHandlers(WebSocketHandlerRegistry registry) { registry.addHandler(groupCallHandler(), "/groupcall"); } } CallHandler类实现TextWebSocketHandler处理文本WebSocket请求。这个类的核心部分是方法handleTextMessage。此方法实现请求的操作,通过WebSocket返回响应public class CallHandler extends TextWebSocketHandler { private static final Logger log = LoggerFactory.getLogger(CallHandler.class); private static final Gson gson = new GsonBuilder().create(); @Autowired private RoomManager roomManager; @Autowired private UserRegistry registry; @Override public void handleTextMessage(WebSocketSession session, TextMessage message) throws Exception { final JsonObject jsonMessage = gson.fromJson(message.getPayload(), JsonObject.class); final UserSession user = registry.getBySession(session); if (user != null) { log.debug("Incoming message from user '{}': {}", user.getName(), jsonMessage); } else { log.debug("Incoming message from new user: {}", jsonMessage); } switch (jsonMessage.get("id").getAsString()) { case "joinRoom": joinRoom(jsonMessage, session); break; case "receiveVideoFrom": final String senderName = jsonMessage.get("sender").getAsString(); final UserSession sender = registry.getByName(senderName); final String sdpOffer = jsonMessage.get("sdpOffer").getAsString(); user.receiveVideoFrom(sender, sdpOffer); break; case "leaveRoom": leaveRoom(user); break; case "onIceCandidate": JsonObject candidate = jsonMessage.get("candidate").getAsJsonObject(); if (user != null) { IceCandidate cand = new IceCandidate(candidate.get("candidate").getAsString(), candidate.get("sdpMid").getAsString(), candidate.get("sdpMLineIndex").getAsInt()); user.addCandidate(cand, jsonMessage.get("name").getAsString()); } break; default: break; } } @Override public void afterConnectionClosed(WebSocketSession session, CloseStatus status) throws Exception { ... } private void joinRoom(JsonObject params, WebSocketSession session) throws IOException { ... } private void leaveRoom(UserSession user) throws IOException { ... } }在afterConnectionClosed方法里,它会将用户userSession从registry房间中移除并驱逐出去@Override public void afterConnectionClosed(WebSocketSession session, CloseStatus status) throws Exception { UserSession user = registry.removeBySession(session); roomManager.getRoom(user.getRoomName()).leave(user); }在joinRoom方法中,服务器检查是否有指定名称的已注册房间,将用户添加到该房间并注册用户private void joinRoom(JsonObject params, WebSocketSession session) throws IOException { final String roomName = params.get("room").getAsString(); final String name = params.get("name").getAsString(); log.info("PARTICIPANT {}: trying to join room {}", name, roomName); Room room = roomManager.getRoom(roomName); final UserSession user = room.join(name, session); registry.register(user); }leaveRoom方法结束一个用户的视频通话private void leaveRoom(UserSession user) throws IOException { final Room room = roomManager.getRoom(user.getRoomName()); room.leave(user); if (room.getParticipants().isEmpty()) { roomManager.removeRoom(room); } }客户端创建WebSocket,在onMessage方法下监听JSON信令协议。有5个不用的消息传入到客户端:existingParticipants,newParticipantArrived,participantLeft,receiveVideoAnswer和iceCandidate。var ws = new WebSocket('wss://' + location.host + '/groupcall'); var participants = {}; var name; window.onbeforeunload = function() { ws.close(); }; ws.onmessage = function(message) { var parsedMessage = JSON.parse(message.data); console.info('Received message: ' + message.data); switch (parsedMessage.id) { case 'existingParticipants': onExistingParticipants(parsedMessage); break; case 'newParticipantArrived': onNewParticipant(parsedMessage); break; case 'participantLeft': onParticipantLeft(parsedMessage); break; case 'receiveVideoAnswer': receiveVideoResponse(parsedMessage); break; case 'iceCandidate': participants[parsedMessage.name].rtcPeer.addIceCandidate(parsedMessage.candidate, function (error) { if (error) { console.error("Error adding candidate: " + error); return; } }); break; default: console.error('Unrecognized message', parsedMessage); } } function register() { name = document.getElementById('name').value; var room = document.getElementById('roomName').value; document.getElementById('room-header').innerText = 'ROOM ' + room; document.getElementById('join').style.display = 'none'; document.getElementById('room').style.display = 'block'; var message = { id : 'joinRoom', name : name, room : room, } sendMessage(message); } function onNewParticipant(request) { receiveVideo(request.name); } function receiveVideoResponse(result) { participants[result.name].rtcPeer.processAnswer (result.sdpAnswer, function (error) { if (error) return console.error (error); }); } function callResponse(message) { if (message.response != 'accepted') { console.info('Call not accepted by peer. Closing call'); stop(); } else { webRtcPeer.processAnswer(message.sdpAnswer, function (error) { if (error) return console.error (error); }); } } function onExistingParticipants(msg) { var constraints = { audio : true, video : { mandatory : { maxWidth : 320, maxFrameRate : 15, minFrameRate : 15 } } }; console.log(name + " registered in room " + room); var participant = new Participant(name); participants[name] = participant; var video = participant.getVideoElement(); var options = { localVideo: video, mediaConstraints: constraints, onicecandidate: participant.onIceCandidate.bind(participant) } participant.rtcPeer = new kurentoUtils.WebRtcPeer.WebRtcPeerSendonly(options, function (error) { if(error) { return console.error(error); } this.generateOffer (participant.offerToReceiveVideo.bind(participant)); }); msg.data.forEach(receiveVideo); } function leaveRoom() { sendMessage({ id : 'leaveRoom' }); for ( var key in participants) { participants[key].dispose(); } document.getElementById('join').style.display = 'block'; document.getElementById('room').style.display = 'none'; ws.close(); } function receiveVideo(sender) { var participant = new Participant(sender); participants[sender] = participant; var video = participant.getVideoElement(); var options = { remoteVideo: video, onicecandidate: participant.onIceCandidate.bind(participant) } participant.rtcPeer = new kurentoUtils.WebRtcPeer.WebRtcPeerRecvonly(options, function (error) { if(error) { return console.error(error); } this.generateOffer (participant.offerToReceiveVideo.bind(participant)); });; } function onParticipantLeft(request) { console.log('Participant ' + request.name + ' left'); var participant = participants[request.name]; participant.dispose(); delete participants[request.name]; } function sendMessage(message) { var jsonMessage = JSON.stringify(message); console.log('Sending message: ' + jsonMessage); ws.send(jsonMessage); } 这里主要依赖于kurento-utils来完成Android上面是官方的代码分析,接下来主要用Android来实现客户端功能,跟one2one一样,都是引用org.webrtc: implementation 'org.webrtc:google-webrtc:1.0.32006' implementation 'org.java-websocket:Java-WebSocket:1.5.3' implementation "com.google.code.gson:gson:2.+"初始化WebSocket,在onMessage里监听JSON信令消息,实现五个方法:existingParticipants,newParticipantArrived,participantLeft,receiveVideoAnswer和iceCandidate when (id) { "existingParticipants" -> { onExistingParticipants(jsonObject) } "newParticipantArrived" -> { onNewParticipantArrived(jsonObject) } "participantLeft" -> { onParticipantLeft(jsonObject) } "receiveVideoAnswer" -> { onReceiveVideoAnswer(jsonObject) } "iceCandidate" -> { iceCandidate(jsonObject) } }existingParticipants:在加入房间后会收到existingParticipants,并告诉有哪些参于者newParticipantArrived:如果有新的参于者加入时,会收到此信息participantLeft:有参于者离开,会收到此信息receiveVideoAnswer:接收到服务器发送的Answer信令iceCandidate:candidates事件发送给服务端的请求:joinRoom:加入到房间的请求receiveVideoFrom:发起接收某参于者时间的请求leaveRoom:离开房间的请求onIceCandidate:将candidate发送到服务端手机与电脑完成连接
-
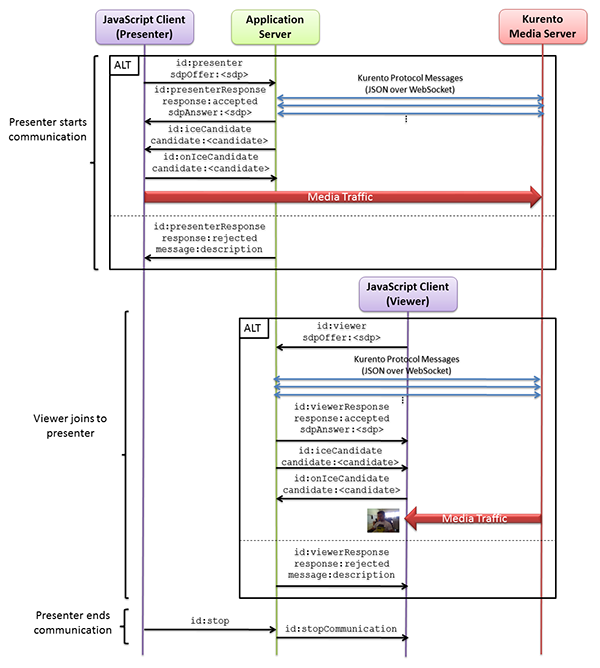
Android Webrtc之Kurento-one2many-call Kurento-one2many-call这是官方的一个例子,一个发送视频,N个人来观看,预览者可以随时离开通讯,当发布者完成会话时,每个连接的预览者都会收到一个停止的消息并终止其会话,类似直播。cd kurento-tutorial-java/kurento-one2many-call mvn -U clean spring-boot:run \ -Dspring-boot.run.jvmArguments="-Dkms.url=ws://{KMS_HOST}:8888/kurento"功能说明:发布者创建offer,并设置本地描述;发布者将offer发送presenter到服务端;发布者接收到presenterResponse,获取到answer并设置远程描述;预览者创建offer,并设置本地描述;预览者将offer,发送viewer到服务端;预览者收到viewerResponse,获取到answer并设置远程描述;一对N端的视频完成,预览者可以随时离开当发布者完成会话时,每个连接的预览者都会收到一个stopCommunication消息并终止其会话。以下是官方流程图:发布者://创建Offer val mediaConstraints = MediaConstraints() peerConnection.createOffer(this, mediaConstraints) ... //设置本地描述 override fun onCreateSuccess(sd: SessionDescription?) { peerConnection.setLocalDescription(this, sd) } ... //设置本地描述成功后发送到服务端 override fun onSetSuccess() { peerConnection.localDescription?.let { sendPresenter(it.description) } }接收到presenterResponse后将answer设置为远程描述:if (message["response"].asString == "accepted") { val sdpAnswer = message["sdpAnswer"].asString peerConnection.setRemoteDescription( this, SessionDescription(SessionDescription.Type.ANSWER, sdpAnswer) ) }预览者//创建Offer val mediaConstraints = MediaConstraints() peerConnection.createOffer(this, mediaConstraints) ... //设置本地描述 override fun onCreateSuccess(sd: SessionDescription?) { peerConnection.setLocalDescription(this, sd) } //设置本地描述成功后发送到服务端 override fun onSetSuccess() { peerConnection.localDescription?.let { sendViewer(it.description) } }预览者接收到viewerResponse后将answer设置为远程描述: if (message["response"].asString == "accepted") { val sdpAnswer = message["sdpAnswer"].asString peerConnection!!.setRemoteDescription( this, SessionDescription(SessionDescription.Type.ANSWER, sdpAnswer) ) }手机端发起视频:电脑端查看视频:
-
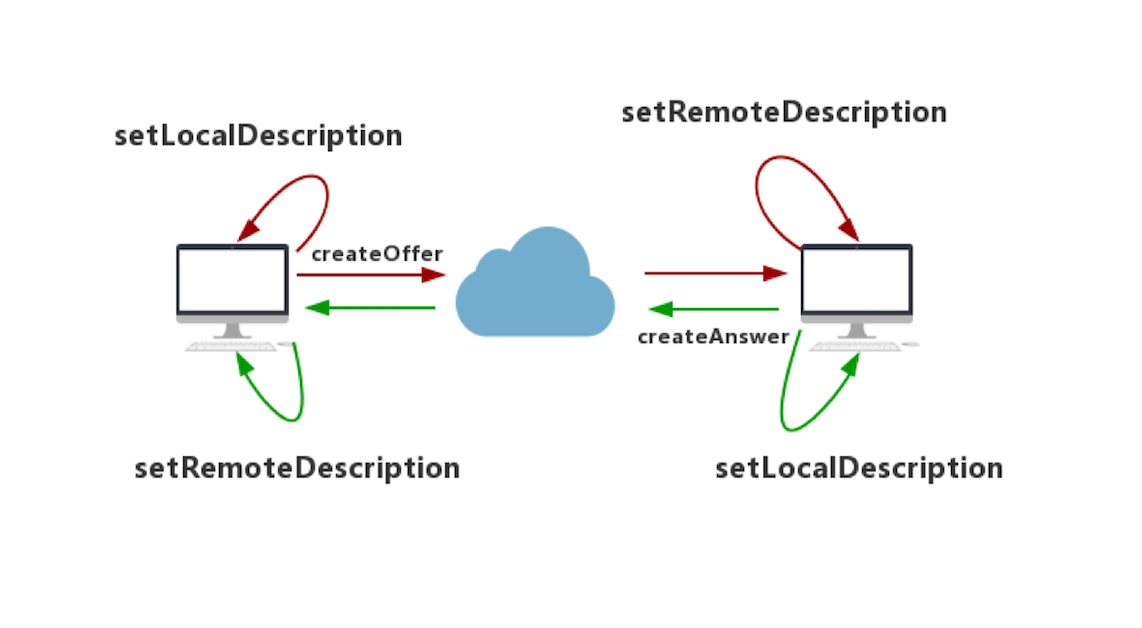
Android Webrtc之Kurento-one2one-call webrtc对等连接ClientA注册,ClientB注册.ClientA创建SdpOffer,成功后调用setLocalDescription()设置为本地描述.ClientA发起Call,将SdpOffer发送给信令服务器.ClientB接收到请求(incomingCall),ClientB接受后配置本地媒体数据.ClientB创建SdpOffer,成功后调用setLocalDescription()设置为本地描述.ClientB发起incomingCallResponse,将sdpOffer发送给信令服务器.ClientB接收到startCommunication,调用setRemoteDescription将SdpAnswer设置为远程描述,ClientB已经获知连接双方的配置.ClientA接收到callResponse,调用setRemoteDescription将SdpAnswer设置为远程描述,ClientA已经获知连接双方的配置.信令主要流程图引入库 implementation 'org.webrtc:google-webrtc:1.0.32006' implementation 'org.java-websocket:Java-WebSocket:1.5.3' implementation "com.google.code.gson:gson:2.+"初始化PeerConnectionFactoryPeerConnectionFactory.initialize( PeerConnectionFactory.InitializationOptions.builder( this.applicationContext ) .setFieldTrials("WebRTC-H264HighProfile/Enabled/") .setEnableInternalTracer(true) .createInitializationOptions() )创建PeerConnecitonFactoryval encoderFactory = DefaultVideoEncoderFactory(bglBase.eglBaseContext, true, true) val decoderFactory = DefaultVideoDecoderFactory(bglBase.eglBaseContext) peerConnectionFactory = PeerConnectionFactory.builder() .setVideoEncoderFactory(encoderFactory) .setVideoDecoderFactory(decoderFactory) .createPeerConnectionFactory()创建PeerConnection val peerConnectionFactory = createPeerConnectionFactory() // 配置STUN穿透服务器 转发服务器 val iceServers = ArrayList<PeerConnection.IceServer>() val iceServer: PeerConnection.IceServer = PeerConnection.IceServer.builder(Config.STUN).createIceServer() iceServers.add(iceServer) // streamList = ArrayList() val configuration = PeerConnection.RTCConfiguration(iceServers) peerConnection = peerConnectionFactory.createPeerConnection(configuration, this) }在Observer.onIceCandidate响应时,将信息发送给服务端override fun onIceCandidate(iceCandidate: IceCandidate?) { //发送IceCandidate sendIceCandidate(iceCandidate) }在OnMessage接收到iceCandidate添加到peerConnectionpeerConnection.addIceCandidate(iceCandidate)初始化WebSocketClientval webSocketClient=object :WebSocketClient(URI.create(Config.URL)){ override fun onOpen(handshakedata: ServerHandshake?) { Log.i(TAG, "WebSocket连接成功") } override fun onMessage(message: String?) { Log.e( TAG, "######## onMessage ########\n$message" ) val jsonObject = Gson().fromJson(message, JsonObject::class.java) when (jsonObject["id"].asString) { REGISTER_RESPONSE -> { // 注册回应 } INCOMING_CALL -> { //来电 } CALL_RESPONSE -> { //呼叫回应 } START_COMMUNICATION -> { //开始通迅 } STOP_COMMUNICATION->{ //停止通迅 } ICE_CANDIDATE -> { //接收到IceCandidate后调用addIceCandidate } } } override fun onClose(code: Int, reason: String?, remote: Boolean) { Log.i(TAG, "onClose code=$code reason=$reason remote=$remote") } override fun onError(ex: Exception?) { ex?.printStackTrace() } }通过PeerConnectionFactory创建数据源VideoTrack/AudioTrack准备摄像头,是否有前置摄像头,如果有就用前置摄像头:private fun createCameraCapturer(enumerator: CameraEnumerator): VideoCapturer? { val deviceNames = enumerator.deviceNames // First, try to find front facing camera Log.d(TAG, "Looking for front facing cameras.") for (deviceName in deviceNames) { if (enumerator.isFrontFacing(deviceName)) { Logging.d(TAG, "Creating front facing camera capturer.") val videoCapturer: VideoCapturer? = enumerator.createCapturer(deviceName, null) if (videoCapturer != null) { return videoCapturer } } } // Front facing camera not found, try something else Log.d(TAG, "Looking for other cameras.") for (deviceName in deviceNames) { if (!enumerator.isFrontFacing(deviceName)) { Logging.d(TAG, "Creating other camera capturer.") val videoCapturer: VideoCapturer? = enumerator.createCapturer(deviceName, null) if (videoCapturer != null) { return videoCapturer } } } return null }在Android系统下有两种Camera,一种称为 Camera1,是一种比较老的采集视频数据的方式,别一种称为Camera2,是一种新的采集视频的方法。它们之间的最大区别是Camera1使用同步方式调用API,Camera2使用异步方式,所以Camera2更高效。这里如果支持Camera2就使用Camera2, 如果不支持就使用Camera1。 private fun createVideoCapturer(): VideoCapturer { return if (Camera2Enumerator.isSupported(this)) { createCameraCapturer(Camera2Enumerator(this))!! } else { createCameraCapturer(Camera1Enumerator(true))!! } }配置视频数据源VideoTrack val videoSource = peerConnectionFactory.createVideoSource(true) val surfaceTextureHelper = SurfaceTextureHelper.create( Thread.currentThread().name, eglBase().eglBaseContext ) val videoCapturer: VideoCapturer = createVideoCapturer() //将videoCapturer与videoSource绑定在一起 videoCapturer.initialize( surfaceTextureHelper, this.applicationContext, videoSource.capturerObserver ) //调用startCapture打开摄像头 videoCapturer.startCapture( Config.VIDEO_RESOLUTION_WIDTH, Config.VIDEO_RESOLUTION_HEIGHT, Config.VIDEO_FPS ) val videoTrack = peerConnectionFactory.createVideoTrack(Config.VIDEO_TRACK_ID, videoSource) videoTrack.setEnabled(true) videoTrack.addSink(localSurfaceView) 配置音频数据源AudioTrack val audioConstraints = MediaConstraints() //回声消除 audioConstraints.mandatory.add( MediaConstraints.KeyValuePair( "googEchoCancellation", "true" ) ) //自动增益 audioConstraints.mandatory.add(MediaConstraints.KeyValuePair("googAutoGainControl", "true")) //高音过滤 audioConstraints.mandatory.add(MediaConstraints.KeyValuePair("googHighpassFilter", "true")) //噪音处理 audioConstraints.mandatory.add( MediaConstraints.KeyValuePair( "googNoiseSuppression", "true" ) ) val audioSource = peerConnectionFactory.createAudioSource(audioConstraints) val audioTrack = peerConnectionFactory.createAudioTrack(Config.AUDIO_TRACK_ID, audioSource) 添加音视频到MediaStreamval medisStream = peerConnectionFactory.createLocalMediaStream("local_stream") medisStream.addTrack(audioTrack) medisStream.addTrack(videoTrack)同样在onAddTrack添加远程视频流即可,以下是两个手机的测试:
-
Centos7防火墙常用命令 Firewall开启端口命令firewall-cmd --zone=public --add-port=21/tcp --permanentFirewall关闭端口命令firewall-cmd --zone=public --remove-port=21/tcp --permanent批量添加区间端口firewall-cmd --zone=public --add-port=10000-20000/tcp --permanent注意:添加端口后,必须用命令firewall-cmd --reload重新加载一遍才会生效查看已开放的端口firewall-cmd --list-ports命令说明:–zone #作用域–add-port=8080/tcp #添加端口,格式为:端口/通讯协议–permanent #永久生效,没有此参数重启后失效防火墙的开启、关闭、禁用命令设置开机启用防火墙:systemctl enable firewalld.service设置开机禁用防火墙:systemctl disable firewalld.service启动防火墙:systemctl start firewalld关闭防火墙:systemctl stop firewalld检查防火墙状态:systemctl status firewalld
-
搭建Kurento服务 在Centos7上搭建Kurento官方网址:https://github.com/Kurento/kurento-media-server官网教程:https://doc-kurento.readthedocs.io/en/latest/user/installation.htmlKurento是一个WebRTC媒体服务器,同时提供了一系列的客户端API,可以简化供浏览器、移动平台使用的视频类应用程序的开发。Kurento支持:群组通信(group communications)媒体流的转码(transcoding)、录制(recording)、广播(broadcasting)、路由(routing)高级媒体处理特性,包括:机器视觉(CV)、视频索引、增强现实(AR)、语音分析Kurento的模块化架构使其与第三方媒体处理算法 —— 语音识别、人脸识别 —— 很容易集成。和大部分多媒体通信技术一样,Kurento应用的整体架构包含两个层(layer)或者叫平面(plane)信号平面(Signaling Plane):负责通信的管理,例如媒体协商、QoS、呼叫建立、身份验证等媒体平面(Media Plane):负责媒体传输、编解码等WebRTC让浏览器能够进行实时的点对点通信(在没有服务器的情况下)。但是要想实现群组通信、媒体流录制、媒体广播、转码等高级特性,没有媒体服务器是很难实现的。Kurento的核心是一个媒体服务器(Kurento Media Server,KMS),负责媒体的传输、处理、加载、录制,主要基于 GStreamer实现。此媒体服务器的特性包括:网络流协议处理,包括HTTP、RTP、WebRTC支持媒体混合(mixing)、路由和分发的群组通信(MCU、SFU功能)对机器视觉和增强现实过滤器的一般性支持媒体存储支持,支持对WebM、MP4进行录像操作,可以播放任何GStreamer支持的视频格式对于GStreamer支持的编码格式,可以进行任意的转码,例如VP8, H.264, H.263, AMR, OPUS, Speex, G.711安装coturnGithub:https://github.com/coturn/coturnyum install -y openssl-devel libevent-devel git #clone 源码 git clone https://github.com/coturn/coturn.git cd coturn ./configure make sudo make install # 启动turnserver nohup turnserver -L 0.0.0.0 -a -u kurento:kurento -v -f -r psvmc.cn & #然后查看相应的端口号3478是否存在进程 sudo lsof -i:3478这样就说明已经可以启动了,接下来我们先停掉turnserver,重新配置turnserver 默认加载配置文件/usr/local/etc/turnserver.conf.cp /usr/local/etc/turnserver.conf.default /usr/local/etc/turnserver.conf #生成证书 openssl req -x509 -newkey rsa:2048 -keyout /usr/local/etc/turn_server_pkey.pem -out /usr/local/etc/turn_server_cert.pem -days 99999 -nodes修改turnserver.conf:vi /usr/local/etc/turnserver.conf内容:# 设置转发的ip(局域网ip),如果不设置,他会自己选择默认的 relay-ip=****** # 转发的外网ip(本机外网ip),用于NAT 地址映射 external-ip=****** # 转发的线程数,其实默认不设置最好 relay-threads=5 #UDP 最小端口和最大端口 min-port=40000 max-port=60000 # WebRTC 的消息里会用到 fingerprint # WebRTC 认证需要 lt-cred-mech #中继服务器的监听器IP地址 listening-ip=0.0.0.0 #静态账号 user=kurento:kurento # 统计状态信息的redis db # redis-statsdb="ip=xx.xx.xxx.xx dbname=3 password=xxxx port=6379 connect_timeout=30" # 用户登录域(例如:dev.com) realm=**** # 证书 cert=/usr/local/etc/turn_server_cert.pem pkey=/usr/local/etc/turn_server_pkey.pem # 输出log log-file=stdout mobility重新启动turnserver:nohup turnserver -c /usr/local/etc/turnserver.conf -v | ts '[%Y-%m-%d %H:%M:%S]' >> /usr/local/etc/turn.log 2>&1 &注意:这个ts命令,是openssl的一个指令,用来打印日期yum install moreutils man ts echo -e "hello world" | ts '[%Y-%m-%d %H:%M:%S]'打开服务器端口:firewall-cmd --zone=public --add-port=3478/tcp --permanent firewall-cmd --zone=public --add-port=3478/udp --permanent firewall-cmd --reload测试stunhttps://webrtc.github.io/samples/src/content/peerconnection/trickle-ice/remove掉默认的stunstun:stun.l.google.com:19302测试stun不需要账号密码,添加上stun:YOUR__IP:3478,然后点击Gather candidates只要出现Done即为成功,下面提示的fail不用在意测试turn添加turn:YOUR__IP:3478,username/password填配置文件里的kurento/kurento同样只要出现Done即为成功用docker安装kurentodocker pull kurento/kurento-media-server:latest运行docker run -d --name kms -p:8888:8888/tcp kurento/kurento-media-server:latest查看一下docker ps -aede4f883c11d kurento/kurento-media-server:latest “/entrypoint.sh” 5 seconds ago Up 4 seconds (health: starting) 0.0.0.0:8888->8888/tcp进入Dockersudo docker exec -it 704d3ed68a49 bash测试服务是否正常curl \ --include \ --header "Connection: Upgrade" \ --header "Upgrade: websocket" \ --header "Host: 127.0.0.1:8888" \ --header "Origin: 127.0.0.1" \ http://127.0.0.1:8888/kurento正常启动会显示{card-describe title="提示"}HTTP/1.1 500 Internal Server ErrorServer: WebSocket++/0.7.0{/card-describe}退出容器exit该Kurento媒体服务器的端口(KMS)过程中默认监听8888客户端WebSocket连接ws://YOUR_IP:8888/kurento配置kurento服务器进入kurento的镜像编辑kurento的配置文件:#进入镜像 docker exec -it kms /bin/bash #安装vim apt-get update apt-get install vim #进入配置文件夹 cd /etc/kurento/modules/kurento/ #编辑配置文件 vim WebRtcEndpoint.conf.ini修改stun和turn信息stunServerAddress=YOUR_IP stunServerPort=3478 turnURL=kurento:kurento@YOUR_IP:3478?transport=udp退出容器,重启kurentoexit docker restart kms测试git clone https://gitee.com/psvmc/kurento-tutorial-java.git cd kurento-tutorial-java/kurento-hello-world vi src/main/resources/static/js/index.js在函数function uiStart()里,增加一个叫iceservers的变量,格式如下:let iceservers={ "iceServers":[ { urls:"stun:YOUR_IP:3478" }, { urls:["turn:YOUR_IP:3478"], username:"kurento", credential: "kurento" } ] }修改option:const options = { localVideo: uiLocalVideo, remoteVideo: uiRemoteVideo, mediaConstraints: { audio: true, video: true }, onicecandidate: (candidate) => sendMessage({ id: 'ADD_ICE_CANDIDATE', candidate: candidate, }), configuration: iceservers //这里增加了一个configuration的key };启动项目mvn -U clean spring-boot:run -Dkms.url=ws://your_ip:8888/kurento启动完之后用浏览器打开demo页面https://your_ip:8443/
-
Android传感器说明 名称说明TYPE_ACCELEROMETER加速度传感器TYPE_MAGNETIC_FIELD磁场传感器TYPE_GYROSCOPE陀螺仪传感器TYPE_LIGHT光照传感器TYPE_PRESSURE气压传感器TYPE_TEMPERATURE手机内部温度传感器TYPE_PROXIMITY距离传感器TYPE_GRAVITY重力传感器TYPE_LINEAR_ACCELERATION线性加速度传感器TYPE_ROTATION_VECTOR旋转矢量传感器TYPE_RELATIVE_HUMIDITY湿度传感器TYPE_AMBIENT_TEMPERATURE手机外部温度传感器TYPE_STEP_DETECTOR累计步数传感器TYPE_STEP_COUNTER单次步数传感器TYPE_ORIENTATION方向传感器检查传感器服务//获取传感器服务 sensorManager = getSystemService(Context.SENSOR_SERVICE) as SensorManager //获取当前手机支持的感应器并打印 sensorManager.getSensorList(Sensor.TYPE_ALL).forEach { Log.e(TGA, "Sensor:${it.name} ${it.stringType}") }
-